
Reading Time: 3 minutes
Ready to kill the moodboard? Here is how to run your first production in the Slayr Studio. We’ve designed the interface to work like a sentence. You just fill in the blanks and let the engine handle the heavy lifting.
Step 1: The Sentence Builder
This is your primary control surface. You aren't "prompting", you’re selecting variables that steer the creative brain.
-
[shootType]: Choose between Studio (clean, product-focused), Location (lifestyle, environmental), or Interior (perfect for "lived-in" business vibes).
-
[brand]: Type your brand name or drop in your URL. This gives the engine a direct line to your current vibe and aesthetic.
-
[location]: This is your world-builder. It doesn't just set the light; it dictates the architecture, the surrounding flora and fauna, and the local "vibe." You can be broad ("The Amalfi Coast") or hyper-specific ("A minimalist brutalist loft with tropical ferns").
-
[imageCount]: Select how many shots you want in this session.
-
[format]: Vertical (social), or Horizontal (web).
-
[imageStyle]: Browse our Style Library. Every style has a visual reference thumbnail to show you exactly how it handles light, color, and contrast before you pick it.
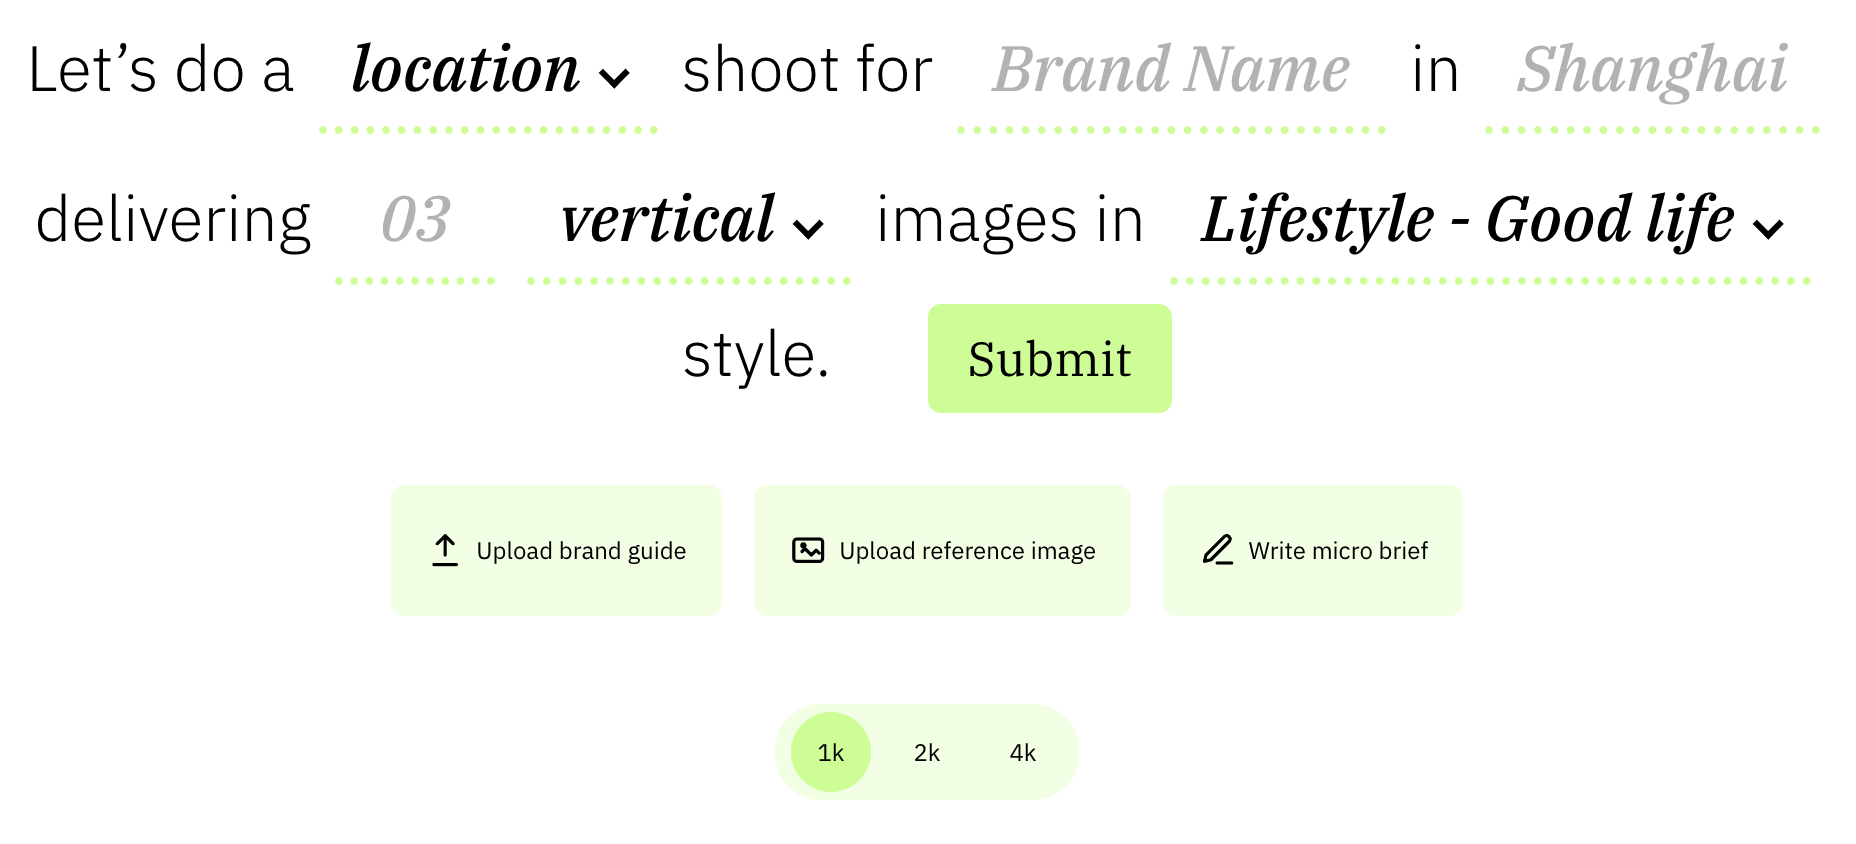
Step 2: Resolution (Choose Wisely)
Choose your resolution before you hit Submit. You cannot "up-res" a 1K image to 4K after the shoot is done, so think about your end-use now.
-
1K: Social and email.
-
2K: Web headers.
-
4K: Print and high-end heroes.
Step 3: Protecting the Hero & Setting Foundations
Next to the sentence builder are the "guardrails" for your shoot.
-
Reference Image: Upload a clean photo of your product, a UI screenshot for software, or even a staff member you want to feature. The platform will create iterations of them in the shot (just make sure you have their permission first!).
-
Brand Guidelines: This is the "Creative Spine" that tells the engine your specific brand cues, personas and more.
-
No Guidelines? No Problem: We’ve built an easy way to create the guidelines Shoot Slayr references most. Just follow the prompts in your Profile Menu to build your guidelines in minutes.
-
Step 4: The Micro Brief (Optional)
The Micro Brief is for "intent shifts." Keep it to a single line.
-
"Make it feel more premium."
-
"Less lifestyle, more product hero."
Step 5: Submit & Wait
Hit Submit. A full production usually takes a couple of minutes. In that time, the engine is researching your category, building a shot list, and "shooting" your frames.
Step 6: The Contact Sheet & The "Fix" Note
Once the shoot is done, you’ll receive a Contact Sheet of finished images.
-
The Edit/Fix Note: If an image is 95% perfect but the AI did something weird—like pouring a drink into a jug instead of a cup—hit the Fix button, give it a brief note on what’s wrong, and the engine will re-render that specific image.
-
Download: Pick the "gems" you love and download them directly to your machine.
The Golden Rule: Don't Aim for One
AI is iterative magic. Don’t bet your whole budget on a single image generation. Aim for a range. By running a shoot of 8 or 12 images, you ensure you get the 3 or 4 absolute masterpieces that would have cost you $5,000.00 USD and a week of your life to shoot for real.
Organize Your Sidebar
On the left-hand side of the Studio, you’ll see your shoot history.
-
Default Naming: By default, Slayr names the shoot after the Style you picked (e.g., "Golden Hour Bloom").
-
The Rename Move: To keep your projects organized, right-click on the shoot name in the sidebar and select 'Rename'. Give it a name you’ll remember, like "Winter 2026 Collection" or "Homepage Hero V2".
Go get 'em.